
We are starting to see more and more women in the studio with pelvic pain, and it was great to see that with input from their medical and allied health team they are able to put some movement back in their routine.
In many cases stretching can help with the pain. The Pelvic Pain Foundation have some stretches on their site.
We have developed some active stretches so that they can be easily done at home.
If you have pelvic pain it is so important to have it assessed by a professional, these stretches should only be used if they do not increase your pain. Start with a visit to your G.P so you can get a referral to your friendly gynaecologist. Another great resource is the Continence Foundation and women’s health physiotherapists.
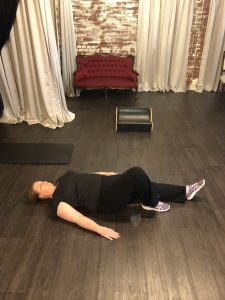
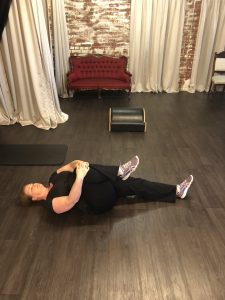
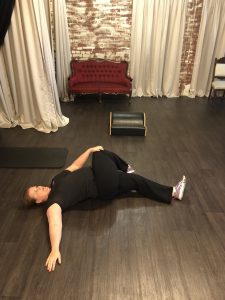
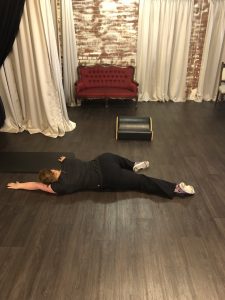
- Start by lying on your back with both legs straight. Bring your left knee in towards your chest, hold the knee with your right hand. Now bring your left knee towards your right shoulder then bring the knee down to the floor on your right side. Transition into a rest position, lying on your tummy, keeping the knee bent. Return to lying on your back and repeat with the right leg.
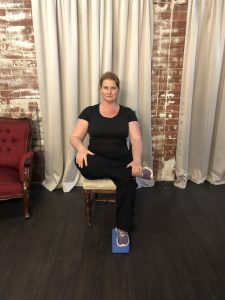
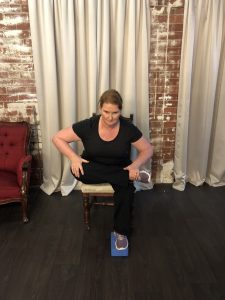
- Glute stretch in motion Seated on a dining chair, cross your right ankle onto your left knee. Keeping your spine in a neutral position, rock forwards and backwards 10 times to help release the pelvic floor. Repeat on the opposite side.
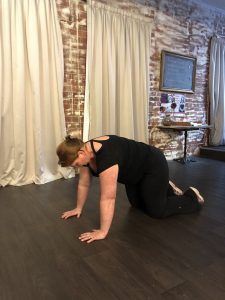
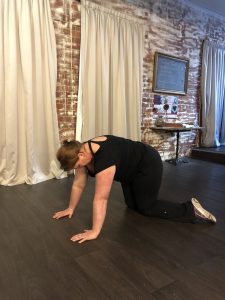
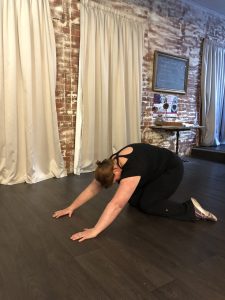
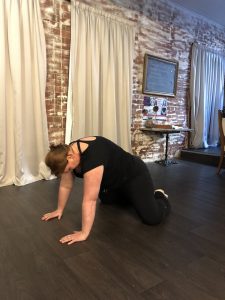
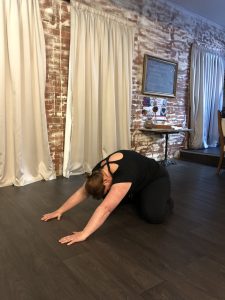
- Rocking in 3 positions Start on all 4s, hands underneath your shoulders and knees underneath your hips. Starting in a parallel alignment, start to rock forwards and backwards, keeping your spine in a neutral position. Now bring your knees together and feet apart then rock forwards and backwards. Lastly, bring your feet together and your knees apart then rock forwards and backwards. Repeat 10 repetitions in each position.

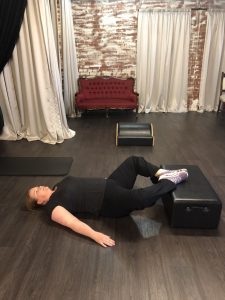
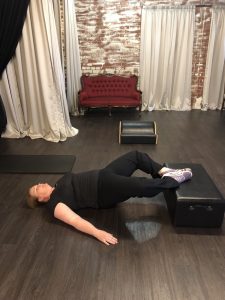
- Frog pelvic curls Lie on your back with your knees bent and your feet resting on a stool. Bring the soles of the feet together, allowing the knees to open, like frog legs. Initiate your pelvic curl by tucking your pubic bone towards your nose then roll up through your spine. Roll back down, ribs, waist, hips then bottom. Repeat 10 repetitions.
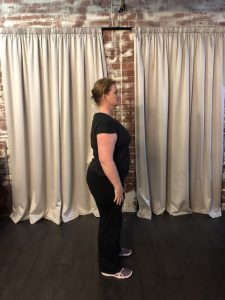
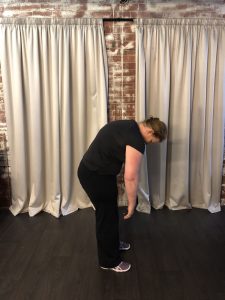
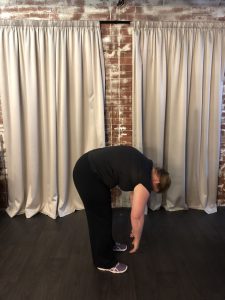
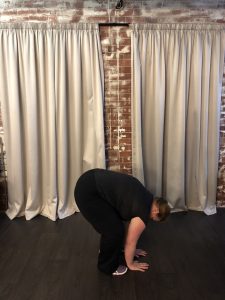
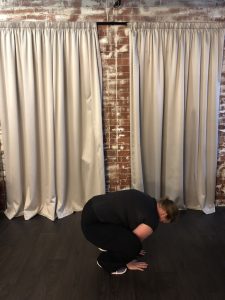
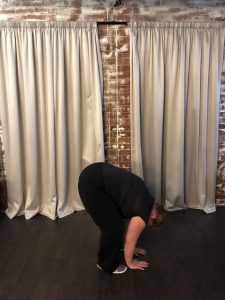
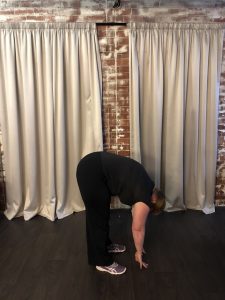
- Roll down with frog Standing with your feet hip-distance, drop your chin towards your chest and start to roll down through the spine. At the bottom, place your hands on the floor with your knees apart, arms inside your knees. Keeping your hands on the floor, try and straighten your legs then begin to roll back up to standing. Repeat 10 repetitions.

 There are a lots of ways to keep your body moving while your back is fully supported
Back pain itself can be caused by a range of conditions. Mechanical causes are by far the most common and include disc issues, muscular spasm, and vertebral joint problems. They are often precipitated by poor biomechanics, such as those affected by years of bad posture and weak stabilising muscles. Back pain can also be caused by trauma, scoliosis, inflammatory arthritis, or pregnancy, just to name a few. There are some rare but quite serious causes and complications of back pain, so if you experience any of these, make sure you see your doctor early: numbness or tingling down your legs, numbness around your anus, severe pain that does not improve with rest, pain after a fall or injury, bladder or bowel trouble, weakness in one or both legs, fever, unintentional weight loss, or night pain.

 In acute, non-specific low back pain, the most important thing is try and keep active and do normal activities as much as possible. Often in order to achieve this, you will need to get in control of your pain first. This might mean seeing your General Practitioner to get some help with pain relief, or it might mean using some simple pain medication from the pharmacy. The important thing is DO NOT REST IN BED for days on end. Gentle mobilisation is vital from the beginning. And if the pain is so bad you can’t move – see your doctor. When you do need to rest in those early days, do so for short periods of time and rest well. This means not sitting down for hours on end, but often lying down in a position that works for you with pillows to support your knees or side.
There is no evidence to support one particular exercise or activity to improve back pain, but we do know that gentle mobilisation is crucial to recovery. So go for a slow walk, do a couple of very gentle, low range stretches or try walking in water. Whatever you do, just keep it low intensity, and focus on simply moving. As your pain improves, and you start moving better, you can start building your activity up again, but don’t go overboard! This is not the time to be jumping straight back into your high intensity gym session. In general, exercise will not aggravate or worsen you injury or back pain. If you feel like your back pain is a little worse the next day, it might be a sign that you need to back off the intensity the next day or so, but it is highly unlikely you have extended the injury provided that you are starting low and going slow.

If you struggle to lie down there are always alternatives
There is little evidence to support any specific complementary treatments for acute back pain, although things like massage or osteopathy might help in the early days with pain and function. After that nothing is really any better than simple exercise. If there is something you want to try and you are sure it won’t do any harm, you can make your own choices. There is also little evidence for any radiological imaging in acute back pain, so if you see your GP and they don’t send you off for an X-ray, CT or MRI straight away, they are actually showing very appropriate management. If pain isn’t improving in the way we would expect it, or any of those ‘red flag’ symptoms listed above are present, we might consider early imaging, but more often than not, it’s not needed.


There are ways you can work on your core strength and still protect your back.
It is a great idea to work with someone once you are out of that really acute (first 72 hour period), to find out about any poor biomechanics and explore how you might be able to prevent any further episodes. Often this is best done with a physiotherapist, as they are well placed to do a full biomechanical assessment and then give you a specifically targeted program to manage any individual issues. From there you can get back in to exercise, but don’t overdo it! Time and again, I’ve seen people get straight back in to the gym, often lifting heavy weights, or trying to get straight back into HIIT or Metafit or boot-camps or step classes….your back is still vulnerable! And until you work out if there is something specific you need to work on (weak abdominal muscles, unilateral tight buttock muscles, poor posture etc), you are setting yourself up for re-injury. And just a little note – whilst ‘core’ is important to posture and back stabilisation, it is all about function. Doing a hundred crunches a day or holding plank for 2 minutes might give you a six-pack, or a nice rigid ‘rack’ but they aren’t going to give you a healthy, strong, flexible and functional core and they might just set you up for a back injury. Find a health provider or fitness instructor that understands how to help you do exercise safely with a focus on function, not just on looks. And remember, if you aren’t getting on top of your back pain in the way we would expect, see a health professional.
The post Low back pain first appeared on 3 Degrees Pilates Studio.]]>When we are younger there are lots of activities that can impact on anyone’s pelvic floor: constipation, chronic coughing, always holding your breath. Basically anytime you increase the pressure in your abdominal cavity by bearing down you can impact your pelvic floor. Certain sports also have an impact; trampolining, horse riding and gymnastics to name a few. Many of these sports create a very strong pelvic floor but it is constantly turned on. Any muscle that is over active is not a functional muscle, and with pelvic floor, non-functioning can lead to leaking urine.
One thing that is inevitable in a woman’s life is menopause. When we head into menopause our hormone levels change. Oestrogen is a female defining hormone, it gives us our breasts, periods, and our waisted shape (this is why our waist thickens after menopause) and it affects how muscles contract and heal. The change in oestrogen affects the pelvic floor in two ways:
- Your pelvic floor does not contract or heal as well, and
- Your pelvic floor can atrophy (waste) by up to 1% a year post menopause.
So with your pelvic floor getting thinner and not contracting as well you are leaving yourself open to leaking urine. If you do not work it, you will loose it!
My biggest bit of advice on pelvic floor health is ‘prevention is better than cure.’ As much as this all sounds very grim there is a simple solution – look after your pelvic floor. Start doing pelvic floor exercises! It does not take much time, but it can have a huge impact on your future life as well as your current one. Did you know that some studies have suggested that pelvic floor muscle strength may be related to increased sensation and sexual satisfaction? So why ignore your pelvic floor? Take control and make it work for you.
For instructions on how to work your pelvic floor head over to WHEN (www.when.org.au) and download your free information sheet on how to preform pelvic floor exercises.

One of our pelvic floor workshops setup to go.
The post Why all women should do pelvic floor work first appeared on 3 Degrees Pilates Studio.]]>Hopefully you will be able to stay health and well this winter but just in case here are a few ways you can protect your pelvic floor:
- Make sure you are doing regular pelvic floor work, even when you don’t have a cough! If you need a reminder about the best exercises to do you might consider attending one of our monthly Pelvic Floor 101 workshops.
- Support your pelvic floor through a cough. You can cross your legs and squeeze your inner thighs together to do this.
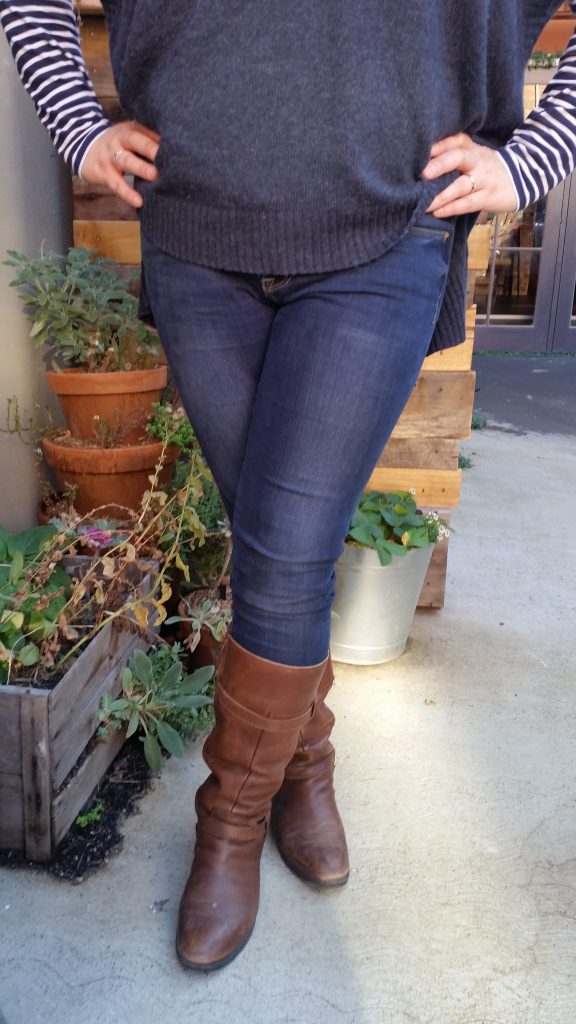
The stronger your pelvic floor is at the beginning of a cold the better it will be afterwards too!
The post Caring for your pelvic floor during cold and flu season first appeared on 3 Degrees Pilates Studio.]]>First port of call is to stretch your glutes and hamstrings. If these muscles are tight it will pull on your lower back. These stretches are really easy to do at home and you don’t need any special equipment!
Even if you do not experience back pain these exercises are a great preventative measure.
If you don’t feel any relief from these stretches please see your general practitioner or allied health professional for further assessment!
Stretch 1

Sit up straight in your chair and place the foot of one leg over the knee of your other leg. Gently press down to get a stretch through your leg. Swap to the other leg and repeat
Stretch 2

Sit up straight in your chair and put one leg on an object slightly lower than your chair, a rubbish bin is ideal! You can lean forward into this for an extra stretch!
Recently we have had quite a few clients twisting ankles. We have done the normal rehab and they have returned to running only to twist their ankle again!
It made me think about some ballet exercises for strengthening feet and ankles I was given when I first trained by an amazing woman Margo Islop, who is a retired ballerina.
So far we have been using these exercises on runners, it’s great to be able to source different techniques from all sorts of fields then apply them to any client who will benefit from it. After we had success with this routine a few of our young dancers started asking about them, so we thought we would put the routine up on the blog so everyone could access it.
Jane’s daughter Lily loves to dance and is determined to build up enough strength to go “en pointe” one day. We thought she would be the perfect dancer to apply this to!
Here she is with a sequence of the foot and ankle strengthening exercises that can be performed anywhere with a theraband!
Lily looks amazing performing these exercises, they are great for dances but they are very diverse and can be used on runners, the elderly any client who needs to build foot and ankle strength.


Loop the band around your big toe. Flex the toe against the band. Then slowly extend the big toe, gently pulling backwards with the band.


Loop the band around the second and third toes, flex and extend the toes.


Loop the band around the fourth and fifth toes. Gently extend and flex the toes.


Place the band around the foot lengthwise, under and across the heels and toes. Flex and extend all toes against the band.


With the band still lengthwise around the foot gently rock your pelvis forward and lean towards your foot as you point the foot.
Huge thanks to our budding ballerina, Lily!
The post Theraband Foot and Ankle Exercises first appeared on 3 Degrees Pilates Studio.]]>
After researching this topic further I wish someone had explained to me the importance of looking after my feet during pregnancy. I know we have so many other body parts to concentrate on during pregnancy and generally we might get a foot rub from our partner if we are lucky. The main concern in most pregnancy are that our feet will swell and we will not fit into our shoes. This is a really common occurrence and we instantly revert to wearing the easiest thing to slip on our feet, Flip flops or thongs, dependant on where you grew up.
So I am here to tell you especially as its summer, don’t wear thongs unless they have some arch support!
There is limited research into this topic but the research that is available is well worth looking into.
It has been found that foot length and width can increase due to pregnancy and also that your foot arch can drop by up to 1cm!
This has been attributed to an altered gait pattern (the way you walk).
This can all be traced back to the fact we have an increase of weight when we are pregnant and also the change in our hormones. Our feet take a beating! The majority of change in feet seems to occur during our first pregnancy. There is a fantastic article: Pregnancy leads to lasting changes in foot structure ( 2013) where the researchers have suggested that the incidence of hip and knee issues are more common in older women who have had children, and they are suggesting this all relates to the fact our arches have dropped.
So when you are pregnant look after your feet!
Give them support, if you have to wear thongs there are whole heap of new thongs around with arch support. Do foot exercises to wake up those little muscles in your feet so your arches get a little extra support.

We use these hard yellow massage balls to wake up the feet. Try 10 to 20 presses on the ball of your foot, repeat on the arch and then the heel. Remember you arch is generally more sensitive so be gentle. We have our pregnant ladies sit down to do this work, just so we can ensure their pelvis does not shear with the movement. You can also substitute a franklin ball if you need something a bit softer.

Another exercise to try is scrunching your toes on a towel. Try to get the towel to move, focus on lifting your arches when preforming this exercise.

The amount of pressure placed on your abdominal muscles during this time leads to a thinning, or in some cases a separation of your stomach muscles resulting in a diastasis. Do not panic if this happens it is quite normal.
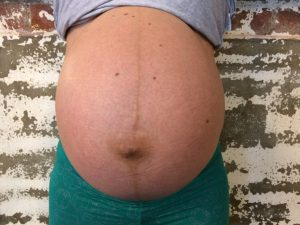
You may notice when you sit up quickly or are getting in and out of the bath your stomach looks like a triangle instead of a nice dome shape, this is a DRAM (diastasis of the rectus abdominus).
Once the muscles have separated during your pregnancy it will not come back together until after the baby is born (due to the fact that your tummy continues to increase in size).
What you do want to do is try and keep the separation to a minimum while you are pregnant.
One explanation we use for our pregnant mums is to compare the separation to that of a broken bone. If you set a broken bone as soon as it happens it will heal better, if you don’t set the bone for a few weeks it will be harder to get back together, may take longer to heal and have complications.
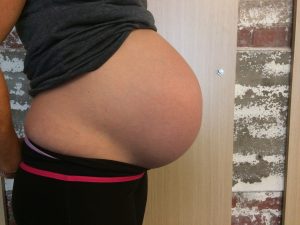
If your tummy muscles do separate you want to look after them and try and reduce the separation as early as possible. You can start this while you are pregnant. If you see your tummy going into that triangle shape you are putting too much strain on your tummy! Try give your baby a gentle hug (bringing your baby back to your spine) you are not trying to crush the baby, just a gentle hug. Remember to roll in and out of bed and to support your tummy when you are lying on your side.

Here are two of our amazing mums to be. This is both their second pregnancy and each has around a 4 finger separation at the moment. We are working with them and in general they now have more control over the separation. When both are lying on their side you can see how the lower side of their tummy dips down, keeping their stomach muscle apart and putting lots of pressure on an already strained muscle. We have popped a Pilates ball under their tummy to bring that separation back together.
So please be careful when you are lifting (especially toddlers!), getting in and out of the bath and exercising. If you can keep more tone in your tummy it WILL recover better after the baby. If you are pregnant or have just had a baby and would like some help getting your diastasis back together please contact us, we CAN help!
We would like to thank our beautiful pregnant clients who allowed us to use their pictures in this blog post and wish them both the best for their impending arrivals!
The post Diastasis During Pregnancy first appeared on 3 Degrees Pilates Studio.]]>
When we googled female abs images, this is a screen shot of the first results you see. Many people perceive that the deep gap running down the centre of the stomach as a toned healthy tummy. In most cases it is a DRAM.
If you flip open a magazine ad you will see that many of the ‘fit mummies’ and even women who have never had a baby feature a prominent DRAM. This weakness puts them at risk of back pain and pelvic instability. How sad is it that the bodies our culture holds up for us to admire and aspire to are too often damaged and compromised!

Can you pick the more functional tummy muscles from these photos? Many of you may choose the wrong pictures. All the women in these photos have had children but the ones on the top do not have a diastasis, the other two do.
It is so important for women to regain healthy, strong, functional bodies that will serve them for their whole lives, rather than getting six pack abs in a twelve week program but weakening the structure of the abs in
the process. I would like to thank our gorgeous tummy models! They are all working with their bodies to achieve the best outcome for themselves. Everyone’s body is different and unique, that makes us special. We should not all look the same or aim to achieve the same bodies. If you do have a diastasis and have had one for over 6 months, there is no magic quick fix. It will take work to change your posture and a life time of habit which maybe keeping it apart! DRAM is fixable in most cases, we all want our bodies to be working well and can achieve this with time and work!
In the six years we have had Lee as our client we have travelled through many up and downs with regards to her body. The determination that she showed was extraordinary. Working with a client who is so committed to improving her lifestyle is very inspiring.
This video shows the amazing progress that she has achieved even in the past year, we just wished we had taken a video when she first commenced Pilates! She has gotten to the point that walking without an aid was possible!
We are extremely lucky that our studio works like a community and everyone takes an interest in others wellbeing. One of our other amazing clients Liz who is a retired physio let us know about a new brace on the market for drop foot. We watched the video and were taken back by the amazing results!

The brace is called the Turbomed 3000 and you can view the video at http://turbomedorthotics.com/. Lee contacted the practitioner in charge of her braces in the past and they agreed that it could really work for her. So the week before she left for the mainland the brace arrived. It was amazing to watch Lee walk with the brace on, even with her improved strength and balance turning around was still an issue, but not with this brace on! It has just been the icing on the cake, the extra confidence in her walking is spectacular.

We will miss Lee terribly but we are very glad to see her starting her new life on the mainland with such great confidence. It has been a pleasure and honour to have been able to assist in Lee’s recovery.
The post Lee is ready to travel first appeared on 3 Degrees Pilates Studio.]]>